Palestine Travel Simulator - Devlog #3
It’s been a while
It has been some time since I’ve done an update post on Palestine Travel Simulator. It’s not that I have stopped developing it. At a certain point it reached a stage where I’m working on features that feel a bit lacklustre to show off on their own. So rather than dedicate a whole post on a single feature, I decided to wait till I made more significant progress. Regardless, here is an update showcasing my work from the past weeks and the current state of Palestine Travel Simulator.
Week 3
For this week and sprint, I had scheduled tha task of creating a system for dynamic road tiles where road tiles would adjust automatically according to its neighbors. So when creating a map, I wouldn’t need to meticulously place the correct tiles. Rather, I would designate a tile as a road and indicate which road type it is. The game will then check its neighbors and choose the correct road tile image for the situation.
As usual, this is easier said than done. My first issue was figuring out how the hex tile’s neighbor data should be stored. After doing some research I realised that each neighbor is either a road or not, which can be saved as a boolean. As each hex tile has 6 neighbors, we can then create a boolean array to represent all of its neighbors. This boolean array is converted into a binary array which is then converted into an integer which we use to look up the correct implementation.
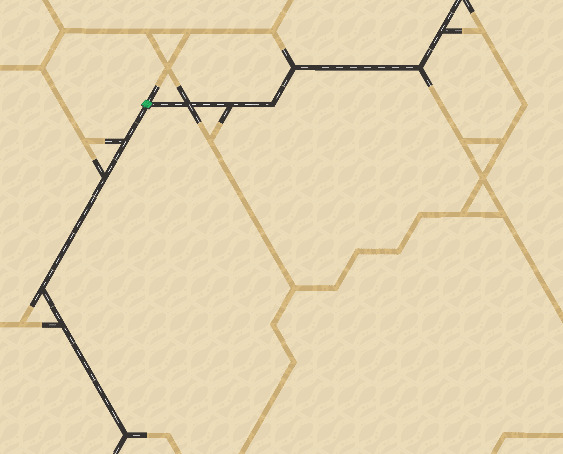
Ok, it sounds rather complicated but it’s actually quite simple. Take the highlighted tile in the image below:

We can say the following for its neighbors:
- Top right: nothing
- Right: road
- Bottom right: nothing
- Bottom left: nothing
- Left: road
- Top left: road
If we then create a boolean array, starting from the top right, it would look something like this: [false, true, false, false, true, true]. If we convert that into a binary array, we would get the following: 010011 which as an integer is the number 19. We use that final integer as the value for a look up table where we can find the correct implementation of the roadtile.
So the theoretical foundation has been laid, we have a method that is robust and works properly. But we still have some considerable gruntwork to finish this. A six bit array means there are 64 possible ways a road tile can be laid. Which I would have to determine manually with the classic pen and paper method:
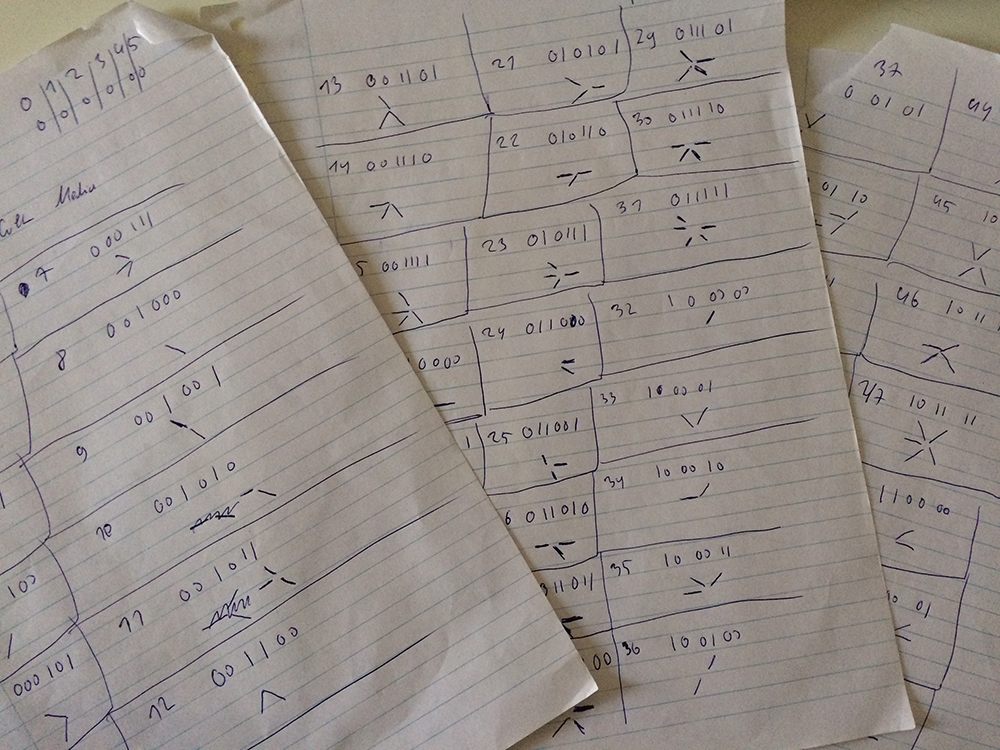
All in all, creating the road tileset, figuring out the method to be used and actually implementing it took the better part of week 3. At least I get to show off the following piece of elegant code if I may say so myself
let neighborsBitfield: string;

if (hex.getIsRoad()) {
    let neighborsArray: number[] = [];
    let neighbors = hex.getNeighborCoordinates();

    for (let k = 0; k < neighbors.length; k++) { // Create an int array of 0 and 1s
        let hexI = neighbors[k][0];
        let hexJ = neighbors[k][1];

        if (this.isHexTileOutOfBounds(hexI, hexJ) && this.getHexTileAtCoordinate(hexI, hexJ).getIsRoad() == true) {
            neighborsArray.push(1);
        } else {
            neighborsArray.push(0);
        }
    }

    neighborsBitfield = neighborsArray.join("");
    let roadTile = getRoadTileType(parseInt(neighborsBitfield, 2));

    switch (hex.getRoadType()) {
    case ERoadType.None:
        break;
    case ERoadType.MSR:
        hex.createRoad("roadMSR" + "_" + roadTile.textureSuffix)
        break;
    case ERoadType.ASR:
        hex.createRoad("roadASR" + "_" + roadTile.textureSuffix)
        break;
    case ERoadType.Dirt:
        hex.createRoad("roadDirt" + "_" + roadTile.textureSuffix)
        break;
    }
    hex.getRoad().angle = roadTile.rotation;
}
And this nifty image of it in action
Week 4
Week 4 was a bit chaotic. I realised that while I have been working on nifty features such as the dynamic road tiles and adding functionality to my objects, I have not been working on the game itself. I had a pathfinding system, I had my gameplay variables, I had my player character but I barely had any implemented gameplay mechanics, nor any interfaces that would make it presentable.
So the plan for Week 4 would be to implement these features and design a basic gameplay loop as soon as possible. However I was asked to make an offer and a proposal for an Unreal Engine 4 project on Tuesday, which meant that I was tied up for three days. Once the proposal was finished on Friday, I figured that it was not worth it to start implementing new large features so I spent the rest of the day cleaning up, commenting and documenting my code and progress.
Week 5
Week 5 was picking up where I left off week 4. I had five simple gameplay mechanics that I had wanted to look at and implement if possible:
- Action time
- Checkpoints adjust tile travel time
- Failure state when time runs out
- Success state when reaching a destination point
- Traffic
The last one, traffic, would have involved some considerable work to implement so I put that aside for the future. Action time, which are basically action points, had been technically implemented but were not utilised yet. Checkpoints have also been implemented and they already adjusted their tile’s travel time. The ability to add different types of checkpoints was possible too.
So now we have to tie everything together by implementing a success and failure state. I implemented these checks in the interactivity portion of my code. When the player makes a move, checks are done to determine if there is enough action time as well as checking whether the destination will be reached by making the next move.
If the player runs out of time, then they are locked out of making moves and the selected path is tinted red to indicate this.
If there was enough time and the player reaches their destination, then a success text pops up and the player is locked out of the making moves. In the future this success will trigger an event for a reward or a further task. This mechanic can also be used to switch between levels.
Also note the tint change indicating when a path passes a checkpoint. This is one of the small experimental details that I’ve been adding with regards to player feedback and to help gauge gameplay.
And now
And that was a lot of words to recap the progress I made the past weeks. It has felt been a bit slow to be honest, and I expected to have made a bit more progress than this. Other projects popped up, learning to work with Phaser proved difficult at times, there was some unneccesary yak shaving and I had some personal loss of focus to top it all off. But looking back at all of it and the progress I’ve made does instill some confidence.
The next steps for Palestine Travel Simulator will be to create an interface framework for it. This will be used to create menus, event pop ups and so on. Once that has been established, I will begin work on creating my own custom assets and artwork for the project. I will also restart my investigative work and discover how actually travelling around the West Bank during crises was like. I’ll see if I can earn some marks of approval from organisations which will greatly help me with the grant requests which I wil submit once this project reaches a feature complete beta state.
But that’s for the slightly far future. Next step is the interface framework, and once that has been established, we’ll take the next step. And once we’ve done that step, we’ll take the step after that, and so on.